


PEX pipe leaks can really mess with your outdoor boiler's performance – impacting both efficiency and your wallet! And that’s exactly why knowing how to identify and patch those leaks quickly is so vital. This guide will take you through everything from PEX Pipe leak detection to knowing when it’s time to call the pros. Let us keep your heating system up and running!
Understanding PEX Pipe Leaks in Outdoor Boilers
PEX pipes are great, but like anything, they can spring a leak. Common culprits include freezing temps (especially in the winter!), issues with the installation, excessive sun exposure or physics — damage from landscaping or construction. Even normal wear and tear can be problematic over time.
These leaks aren't just annoying; they can really impact your system. If not attended to carefully, you could find yourself with reduced efficiency, higher bills, and, even damage to your house from leaking water. If you ignore a leak, the entire system (or worse, the boiler itself) could fail completely. So, regular checks are key!
Signs of a PEX Pipe Leak
Visual Indicators
-
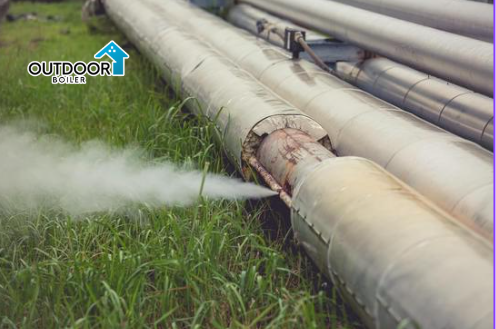
Wet spots or pooling water around pipe runs
-
Unexplained vegetation growth along pipe paths
-
Frost or ice formation during winter
-
Visible drips or spray from connections
-
Discolored or damaged insulation
Performance Issues
-
Decreased boiler pressure
-
Increased fuel consumption
-
Inconsistent heating
-
More frequent system refills
-
Higher than normal utility bills
Locating PEX Pipe Leaks
Visual Inspection Method
First, let's do a visual check. It's the easiest way to spot problems. Just remove any pipe insulation and take a good look at all the connections and fittings. Check the pipes themselves for any damage, look for water stains or corrosion, and make sure the supports are still doing their job.
Pressure Testing
If you don't see anything obvious, it's time to get a little more technical with a pressure test. Isolate sections of your piping system, then pressurize it with air or water. Keep a close eye on the pressure gauge – any drops will point you toward a leak. This helps narrow down the problem area.
Advanced Detection Methods
For trickier leaks, you might need some more advanced tools. Think things like ultrasonic leak detectors, thermal imaging cameras, or even tracer dye testing. These methods also can locate leaks that are concealed or difficult to identify with the naked eye. If you need assistance with these more advanced techniques, don’t hesitate to call a professional. Learn more about Advanced Leak Detection Techniques by reading THIS ARTICLE.
DIY Repair Options for Minor Leaks

Temporary Solutions
If you've got a small leak and need a quick fix for a boiler repair, there are a few temporary solutions you can try. You can patch things up with leak repair clamps, epoxy putty, silicone tape, compression fittings, or even replacement couplings. Good for short-term solutions or small leaks, but be advised, those are temporary – if you need a more permanent solution for your leak repair, your next step will be replacing the damaged section of pipe.
Step-by-Step Repair Process
-
Shut off system water supply
-
Drain affected section
-
Clean and dry the leak area
-
Apply chosen repair method
-
Test repair under pressure
-
Monitor for continued leakage
Professional Repair Scenarios
When to Call an Expert
Sometimes, you just need to call in the professionals. If you have multiple leaks, a break in your main line, damage to underground pipes, system-wide pressure issues, a particularly difficult fitting failure or you need to file an insurance claim it is time to turn it over to the professionals. They have the tools and experience to handle these more complex situations safely and efficiently.
Professional Repair Methods
When it's time for a proper repair, a professional will likely replace the damaged pipe section completely. They'll use proper crimp fittings and might even redesign parts of your system if needed. They’ll also pressure test everything to ensure it’s running flawlessly and install new insulation to keep your pipes safe. That’s the best way to get a system that will be long lasting, will work efficiently and will be safe.
Preventing Future PEX Pipe Leaks
Regular Maintenance
-
Annual system inspection
-
Pressure testing schedule
-
Insulation checks
-
Connection verification
-
Professional assessment
Best Practices for PEX Pipe Leak Detection
-
Proper pipe support installation
-
UV protection measures
-
Freeze prevention techniques
-
Quality fitting selection
-
Professional installation standards
Long-Term Solutions

System Upgrades
While you're at it, you might want to consider upgrading your system! Consider establishing better pipe insulation to prevent freezing, adding stronger support systems and better fittings, or even including monitoring equipment or redundancy. Such upgrades can help avoid future issues and provide additional peace of mind. Investing in a long-term healthy system.
Documentation
Keeping good records is key! Be sure to document all repairs made, pressure test results, any changes you have made to the system, as well as the dates of professional inspections. This will allow you to track your system health over time and quickly detect potential issues before they become critical. This will also be super helpful in case you ever need to file an insurance claim.
Always Keep This In Mind
-
Conduct regular system inspections
-
Document any changes in performance
-
Keep repair supplies on hand
-
Maintain professional contacts
-
Consider preventive upgrades
Conclusion: Taking Action on PEX Pipe Leaks
Finding and fixing leaks in your PEX pipes quickly is super important for keeping your outdoor boiler running smoothly and preventing expensive repairs down the road. Within no time, a small leak left unresolved can escalate into a major issue, resulting in lower operating efficiency, increased energy bills, and potential harm to your boiler itself. Whether you’ll undertake simple repairs yourself, or bring someone in for more serious leaks, the goal is addressing common leak causes promptly so that your heating system keeps you warm and cozy throughout winter. Feel free to ask for help in boiler repair or replacing the insulation, as we do not want a small leak becoming a large problem.
Need professional assistance with your outdoor boiler system? Visit Outdoorboiler.com to look for solutions and browse products for your pesky leak problems.
FAQs
How to check PEX for leaks?
Do a visual inspection for pooling water, dampness or stains. You can do a pressure test and look for pressure drops that would signal leaks.
Can PEX pipes leak?
Yes, PEX pipes may leak due to other common leak causes such as improper installation, damage from freezing, wear and tear, or defective fittings.
How does pipe leak detection work?
For leak detection, the process is down to visual inspection, pressure tests for falls and even sometimes specific equipment, such as acoustic sensors to locate the source of hidden leaks.
How do I identify a PEX pipe?
PEX pipes come in color (Red, Blue, White, Gray) and are stamped with the letters PEX as well as Manufacturer's details and compliance standards. Checkout this Comprehensive Guide to learn more about PEX Pipes.


